This blog now lives at http://blog.rraghur.in
If you’ve subscribed to feeds, please update the feed urls as well.
This blog now lives at http://blog.rraghur.in
If you’ve subscribed to feeds, please update the feed urls as well.
In my last post on unit testing, I had written about a technique I’d learnt forsimplifying test set ups with the builder pattern. It provides a higher level, more readable API resulting in DAMP tests.
Implementing it though presented a few interesting issues that were fun to solve and hopefully, instructive as well. I for one will need to look it up if I spend a few months doing something else – so got to write it down :).
In Scheduler user portal, controllers derive from the MVC4 Controller class whereas others derive from a custom base Controller. For instance, Controllers that deal with logged in interactions derive from TenantController which provides TenantId and SubscriptionId properties. IOW, a pretty ordinary and commonplace setup.
   class EventsController : Controller
    {
        public ActionResult Post (MyModel model)
        {
        // access request, form and other http things
        }
    }

    class TenantController: Controller
    {
        public Guid TenantId {get; set;}
        public Guid SubscriptionId {get; set;}
    }

    class TaskController: TenantController
    {
        public ActionResult GetTasks()
        {
            // Http things and most probably tenantId and subId as well.
        }
    }
So, tests for EventsController will require HTTP setup (request content, headers etc) where as for anything deriving from TenantController we also need to be able to set up things like TenantId.
Let’s start from how we’d like our API to be. So, for something that just requires HTTP context, we’d like to say:
    controller = new EventsControllerBuilder()
                .WithConstructorParams(mockOpsRepo.Object)
                .Build();
And for something that derives from TenantController:
    controller = new TaskControllerBuilder()
                .WithConstructorParams(mockOpsRepo.Object)
                .WithTenantId(theTenantId)
                .WithSubscriptionId(theSubId)
                .Build();
The controller builder will basically keep track of the different options and always return this to facilitate chaining. Apart from that, it has a Build method which builds a Controller object according to the different options and then returns the controller. Something like this:
    class TaskControllerBuilder()
    {
        private object[] args;
        private Guid tenantId;
        public TaskControllerBuilder WithConstructorParams(params object args )
        {
            this.args = args;
            return this;
        }

        public TaskControllerBuilder WithTenantId(Guid id )
        {
            this.tenantId = id;
            return this;
        }

        public TaskController Build()
        {
            var mock = new Mock<TaskController>(MockBehavior.Strict, args);
            mock.Setup(t => t.TenantId).Returns(tenantId);
            return mock.Object;
        }
    }
Writing XXXControllerBuilder for every controller isn’t even funny – that’s where generics come in – so something like this might be easier:
    controller = new ControllerBuilder<EventsController>()
                .WithConstructorParams(mockOpsRepo.Object)
                .Build();
and the generic class as:
    class ControllerBuilder<T>() where T: Controller
    {
        private object[] args;
        private Guid tenantId;
        protected Mock<T> mockController;

        public ControllerBuilder<T> WithConstructorParams(params object[] args )
        {
            this.args = args;
            return this;
        }

        public T Build()
        {
            mockController = new Mock<T>(MockBehavior.Strict, args);
            mockController.Setup(t => t.TenantId).Returns(tenantId);
            return mock.Object;
        }
    }
In takes about 2 seconds to realize that it won’t work – since the constraint only specifies T should be a subclass of Controller, we do not have the TenantId or SubscriptionId properties in the Build method.
Hmm – so a little refactoring is in order. A base ControllerBuilder that can be used for only plain controllers and a sub class for controllers deriving from TenantController. So lets move the tenantId out of the way from ControllerBuilder.
    class TenantControllerBuilder<T>: ControllerBuilder<T>
         where T: TenantController          // and this will allow to
                                            // access TenantId and SubscriptionId
    {
        private Guid tenantId;
        public TenantControllerBuilder<T> WithTenantId(Guid tenantId)
        {
            this.tenatId = tenantId;
            return this;
        }

        public T Build()
        {
            // call the base
            var mock = base.Build();
            // do additional stuff specific to TenantController sub classes.
            mockController.Setup(t => t.TenantId).Returns(this.tenantId);
            return mock.Object;
        }
    }
Now, this will work as intended:
/// This will work:
controller = new TenantControllerBuilder<TaskController>()
            .WithTenantId(guid)                             // Returns TenantControllerBuilder<T>
            .WithConstructorParams(mockOpsRepo.Object)      // okay!
            .Build();
But this won’t compile: 😦
controller = new TenantControllerBuilder<TaskController>()
            .WithConstructorParams(mockOpsRepo.Object)  // returns ControllerBuilder<T>
            .WithTenantId(guid)                         // Compiler can't resolve WithTenant method.
            .Build();
This is basically return type covariance and its not supported in C# and will likely never be. With good reason too – if the base class contract says that you’ll get a ControllerBuilder, then the derived class cannot provide a stricter contract that it will provide not only a ControllerBuilder but that it will only be TenantControllerBuilder.
But this does muck up our builder API’s chainability – telling clients to call methods in certain arbitrary sequence is a no – no. And this is where extensions provide a neat solution. Its in two parts
TenantControllerBuilder.ControllerBuilder to TenantControllerBuilder safely with the extension api.
// Only state:
class TenantControllerBuilder<T> : ControllerBuilder<T> where T : TenantController
{
    public Guid TenantId { get; set; }

    public override T Build()
    {
        var mock = base.Build();
        this.mockController.SetupGet(t => t.TenantId).Returns(this.TenantId);
        return mock;
    }
}

// And extensions that restore chainability
static class TenantControllerBuilderExtensions
{
    public static TenantControllerBuilder<T> WithTenantId<T>(
                                        this ControllerBuilder<T> t,
                                        Guid guid)
            where T : TenantController
    {
        TenantControllerBuilder<T> c = (TenantControllerBuilder<T>)t;
        c.TenantId = guid;
        return c;
    }

     public static TenantControllerBuilder<T> WithoutTenant<T>(this ControllerBuilder<T> t)
            where T : TenantController
    {
        TenantControllerBuilder<T> c = (TenantControllerBuilder<T>)t;
        c.TenantId = Guid.Empty;
        return c;
    }
}
So, going back to our API:
///This now works as intended
controller = new TenantControllerBuilder<TaskController>()
            .WithConstructorParams(mockOpsRepo.Object)  // returns ControllerBuilder<T>
            .WithTenantId(guid)                         // Resolves to the extension method
            .Build();
It’s nice sometimes to have your cake and eat it too :D.
Had some fun at work today. The web portal to Scheduler service is written in ASP.NET MVC4. As such we have a lot of controllers and of course there are unit tests that run on the controllers.
Now, while ASP.NET MVC4 apparently did have testability as a goal, it still requires quite a lot of orchestration to test controllers. Now all this orchestration and mock setups only muddies the waters and gets in the way test readability. By implication, tests are harder to understand, maintain and eventually becomes harder to trust the tests.
Let me give an example:
 [TestFixture]
public class AppControllerTests  {
    // private
    /// set up fields elided
    // elided

    [SetUp]
    public void Setup()
    {
        _mockRepo = new MockRepository(MockBehavior.Strict);
        _tenantRepoMock = _mockRepo.Create();
        _tenantMapRepoMock = _mockRepo.Create();
        _controller = MvcMockHelpers.CreatePartialMock(_tenantRepoMock.Object, _tenantMapRepoMock.Object);

        guid = Guid.NewGuid();

        // partial mock - we want to test controller methods but want to mock properties that depend on
        // the HTTP infra.
        _controllerMock = Mock.Get(_controller);
    }

    [Test]
    public void should_redirect_to_deeplink_when_valid_sub()
    {
        //Arrange
        _controllerMock.SetupGet(t => t.TenantId).Returns(guid);
        _controllerMock.SetupGet(t => t.SelectedSubscriptionId).Returns(guid);
        var formValues = new Dictionary<string,string>();
        formValues["wctx"] = "/some/deep/link";
        _controller.SetFakeControllerContext(formValues);

        // Act
        var result = _controller.Index() as ViewResult;

        //// Assert
        Assert.That(result.ViewName, Is.EqualTo(string.Empty));
        Assert.That(result.ViewBag.StartHash, Is.EqualTo("/some/deep/link"));
        //Assert.That(result.RouteValues["action"], Is.EqualTo("Register"));

        _mockRepo.VerifyAll();
    }
}
As you can see, we’re setting up a couple of dependencies, then creating the SUT (_controller) as a partial mock in the setup. In the test, we’re setting up the request value collection and then exercising the SUT to check if we get redirected to a deep link. This works – but the test set up is too complicated. Yes – we need to create a partial mock that and then set up expectations that correspond to a valid user who has a valid subscription – but all this is lost in the details. As such, the test set up is hard to understand and hence hard to trust.
I recently came across this pluralsight course and there were a few thoughts that hit home right away, namely:
Test setups require various objects in different configurations – and that’s exactly what a Builder is good at. The icing on the cake is that if we can chain calls to the builder, then we move towards evolving a nice DSL for tests. This goes a long way towards improving test readability – tests have become DAMP.
So here’s what the Builder API looks like from the client (the test case):
[TestFixture]
public class AppControllerTests {
    [SetUp]
    public void Setup()
    {
        _mockRepo = new MockRepository(MockBehavior.Strict);
        _tenantRepoMock = _mockRepo.Create();
        _tenantMapRepoMock = _mockRepo.Create();
        guid = Guid.NewGuid();
    }

    [Test]
    public void should_redirect_to_deeplink_when_valid_sub()
    {
        var formValues = new Dictionary<string, string>();
        formValues["wctx"] = "/some/deep/link";

        var controller = new AppControllerBuilder()
            .WithFakeHttpContext()
            .WithSubscriptionId(guid)
            .WithFormValues(formValues)
            .Build();

        // Act
        var result = _controller.Index() as ViewResult;

        //// Assert
        Assert.That(result.ViewName, Is.EqualTo(string.Empty));
        Assert.That(result.ViewBag.StartHash, Is.EqualTo("/some/deep/link"));
        //Assert.That(result.RouteValues["action"], Is.EqualTo("Register"));

        _mockRepo.VerifyAll();
    }
}
While I knew what to expect, it was still immensely satisfying to see that:
You might think that this is just sleight of hand – after all, have we not moved all the complexity to the AppControllerBuilder? Also, I haven’t shown the code – so definitely something tricky is going on ;)?
Well not really – the Builder code is straight forward since it does one thing (build AppControllers) and it does that well. It has a few state properties that track different options. And the Build method basically uses the same code as in the first code snippet to build the object.
Was that all? Well not really – you see, as always, the devil’s in the details. The above code is’nt real – its more pseudo code. Secondly, an example in isolation is easier to tackle. However, IRL (in real life), things are more complicated. We have a controller hierarchy. Writing builders that work with the hierarchy had me wrangling with generics, inheritance and chainability all at once :). I’ll post a follow up covering that.
Well not really – but I have your attention now… So in my last post, I talked about moving my home computer from Win 7 to Linux Mint KDE. That went ok for the most part other than some minor issues.
Fast-forward a day and I hit my first user issue :)… wife’s workplace has some video content that is distributed as DRM protected swf files that wil play only through a player called HaiHaiSoft player!
Went through installation and got Windows up and running. Once I got the OS installed, also installed guest additions and it runs surprisingly well. I’d only used Virtualbox for a linux guest from a Windows host before so it was a nice change to see how it worked the other way around.
Anyway, once the VM was installed, downloaded and installed the player and put a shortcut to virtualbox on the desktop. Problem solved!
So after suffering tons of crashes (likely due to AMD drivers) and general system lagginess, I finally decided to ditch windows and move to linux full time.
This is on my home desktop which is more a family computer than something that only I would use.
I was a little apprehensive with driver support as usual and tricky stuff like suspend to ram (s3) which always seems highly driver dependent and problematic on Linux (it is still a pain on my XBMCBuntu box). Anyway, nothing like trying it out.
After looking around a bit, downloaded Linux Mint 15 (default and KDE). Booted with the Live CD and liked the experience – though GNOME seems a bit jaded and old. I liked KDE much better – esp since it seems more power user friendly.
So after testing hardware stuff (Suspend, video drivers and so on) – all of which worked flawlessly, I must say, I decided to go ahead and install it on one of my HDDs. Unfortunately, installation was rocky a bit – I don’t know if it was just me – the mint installer would progress up to preparing disks and hang there for 10+ minutes without any feedback I’m assuming it is reading partition tables and so forth – but no idea why it took so long. A thought it’d hung a couple of times – so terminated it and it was only accidentally that I found that it was still working – when I left it on its own for sometime and got back. It presented my the list of options (guided partition on entire disk, co locate with another OS etc) – but things actually went worse after this.
What seems to have happened is that my pending clicks on the UI all were processed and it proceeded to install on my media drive before I had a chance … wiped out my media drive. Thankfully, before installation I had a backup of the important stuff on that drive and so it wasn’t a biggie…
At this point, I was having serious doubts of continuing with Mint and was ready to chuck it out of the window and go back to Kubuntu or just back to Windows. However, I hung on – given that I’d wiped a drive, might as well install it properly and then wipe it if it wasn’t good.
Anwyay, long story short, I restarted the install, picked my 1TB drive and partitioned it as 20GB /, 10Gb /var, 1Gb /boot and remaining as unpartitioned.
Mint went through the installation and seemed to take quite sometime – there were a couple of points where the progress bar was stuck at some percentage for
multiple minutes and I wasn’t sure if things were proceeding or hung. In any case, after the partitioning window, I was more inclined to wait. Good that I did since the installation did eventually complete.
Feedback to Mint devs – please make the installer be more generous with feedback – esp if the installer goes into something that could take long.
Post installation, rebooted and grub shows my windows boot partition as well as expected. I still haven’t tried booting into windows so I that’s one thing to check. Booted into Mint and things looked good. Set up accounts for my dad and my wife. one thing I had to do was edit /etc/pam.d/common-password to remove password complexity (obscure) and set minlen=1
password [success=1 default=ignore] pam_unix.so minlen=1 sha512
Next was to set up local disks (2 ntfs and 1 fat32 partition) so that they are mounted at boot and everyone can read and write to them. I decided to go the easy route and just put entries in /etc/fstab
UUID=7D64-XXX  /mnt/D_DRIVE    vfat      defaults,uid=1000,gid=100,umask=0007                   0       2
UUID="1CA4559CXXXXX" /mnt/E_DRIVE ntfs rw,auto,exec,nls=utf8,uid=1000,gid=100,umask=0007                0       2
UUID="82F006D7XXXX" /mnt/C_DRIVE ntfs rw,auto,exec,nls=utf8,uid=1000,gid=100,umask=0007                 0       2
That fixed the mount issue but still need to have them surface properly on the file manager (dolphin) – this was actually quite easy – I just added them as places, removed the device entries from the right click menu. This worked for me – I’d have liked to make this the default but didn’t find a way. Finally decided to just copy the ~/.local/share/user-places.xbel file to each local user and set owner.
Other than that, I also need to be able to connect my nexus 4 and 7 as MTP devices. I had read that this doesn’t work out of the box – but looks like that’s been addressed in ubuntu 13.04 (and hence in Mint)
I also need adb and fastboot – so just installed them through synaptic. BTW, that was awesome since it means that I didn’t have to download the complete android SDK just for two tools.
Well, I’m still wondering why I didn’t migrate full time to linux all these years. THings have been very smooth – but I need to call out key improvements that I’ve seen till now
Well, that’s it for now. I know that a lot of it might be ‘new system build’ syndrome whereas on windows gunk had built up over multiple years. However, note that my windows install was fully patched and up to date. Being a power user, I was even going beyond the default levels of tweaking (page file on separate disk from system etc) – but just got tired of the issues. The biggest trigger was the GPU crashes of course and here to updating to latest drivers didn’t seem to help much. I fully realize that its almost impossible to generalize things. My work laptop has Win 7×64 Enterprise and I couldn’t be happier – it remains snappy and fast in spite of a ton of things being installed (actually, maybe not – the linux boot is still faster) – but it is stable.
And of course, there might be a placebo effect at some places – but in the end what matters is that things work.
So I was looking at this vim tip for finding in files from within Vim – while it looks helpful, there are a number of possible improvements:
[Enter].expand("%:e") returns empty stringlvimgrep is cross platform but slow – let’s use Mingw grep too for vimgrepIt was more of an evening of scratching an itch (a painful one if you’re zero in vimscript 🙂 ). Here’s the gist gist for it- hope someone finds it useful.
Feel free to tweak the mappings – I use the following:
Save the file to your .vim folder and source it from .vimrc
so ~/.vim/grephacks.vim
A few notes:
Here’s how it looks in action when I’ve selected some text and pressed leader-f:

Happy vimming!
This is a part rant, part tip – so bear with me… My broadband connection absolutely sucks over the past week. I upgraded from 2Mbps with a download limit to a 4Mbps with unlimited downloads and since then it has been nothing but trouble… Damn BSNL!! I’ve probably registered about 30 odd complaints with them to no avail. If there was a Nobel for bad customer service, BSNL would probably win it by a mile. Some examples:
Guess they find it too troublesome that someone who’s paying for broadband actually expects the said broadband connection to work reliably!
Anyway, Airtel doesn’t seem to be any better – they need 10 days to set up a connection and when I was on the phone with them, they didn’t seem too interested in increasing their customer count by 1 :).
I also tried calling an ISP called YouBroadband after searching some of the Bangalore forums for good ISP providers. They promised a call in 24 hours to confirm if they have coverage in my area and it was feasible for them to set up the connection and that was 48 hours ago!
At work, I’ve heard good things about ACTBroadband and they have some ads in TOI as well, but they said they don’t have coverage in my area :(.
Today I needed to download something and doing it from the browser failed each time since my DSL connection would blink out in between!
After ranting and raving and writing the first part above and still mentally screaming at BSNL, decided to do something about it… Time for trusty old wget – surely, it’ll have something?
Turns out that guess was a 100% on the money… it took a few tries experimenting with different options, but finally worked like a charm
wget -t0 --waitretry=5 -c -T5 url
    where
    -t0 - unlimited retries
    --waitretry - seconds to wait between retries
    -c resume partially downloaded files
    -T5 - set all timeouts to 5 seconds. Timeouts here are connect timeout, read timeout and dns timeout
We released the Scheduler service (cloud hosted cron that does webhooks) on the 18th of Jan. It was our first release (still in beta) and you can sign up for it via the Windows Azure store as an addon. Upcoming release will have a full portal and the ability to register without going via the Windows Azure portal.
We’ve been building the user portal to the Scheduler service as a Single Page app (SPA) and I wanted to share a some background and insights we’ve gained.
To review, an SPA is a web app contained in a single page – where ‘pages’ are nothing but divs being shown/hidden based on the state of the app and user navigation.
The benefits are that you never have a full page refresh at all – essentially, page loads are instantaneous and data is retrieved and shown via AJAX calls. From a UX standpoint, this delivers a ‘speedier’ experience, since you never see the ‘static’ portions of your page reload when you navigate around.
All that speediness is great but the downsides are equally important:
Navigation – SPA’s by nature break the normal navigation mechanism of the browser. Normally, you click a link, it launches off a request and would update the url on the address bar. The response is then fetched and painted. In an SPA however, a link click is trapped in JS and the state is changed and you show a different div (with a background AJAX req being launched).
This breaks Back/Forward navigation and since the URL doesn’t change, bookmarkability is also broken to boot.
SEO – SEO also breaks because links are associated with JS script and most bots cannot follow such links.
Now, none of this is really new. Gmail was probably the first well known SPA implementation and that’s been around since 2004. What’s changed is tha t now there are better tools and frameworks for writing SPAs. So how do you get around the problems?
When we started out with the Portal, we needed to take some decisions around how to go about it
We evaluated different frameworks for building the SPA. We wrote a thin slice of the portal – a few public pages, a Social login page and a couple of logged in pages for navigation and bookmarkability.
1. KO+ approach – I’m calling this KO+ as it’s KO is just a library for MVVM binding and we needed a bunch of other libraries for managing other aspects of the SPA.
– Knockout.js – for MVVM binding
– Sammy.js – Client side routing
– Require.js – script dependency management.
– Jquery – general DOM manipulation when we needed it.
2. Angular.js – Google’s Angular.js is a full suite SPA framework that handles all the aspects of SPA
We chose the KO+ approach as there was knowledge and experience on KO in the team. The learning curve’s also lesser since each library can be tackled at a time. While Angular offers a full fledged SPA framework, it also comes with more complexity to be grappled with and understood – essentially, the ‘Angular’ way of building apps.
That said, once you get over the initial learning curve of Angular, it does have a pleasant experience and you don’t have to deal with integration issues that come up when using different libraries. We had prior experience on KO on the team so it just made sense to pick it given our timelines.
I’ll post an update once we have it out of the door and ready for public consumption.
While developing any significant piece of code, you end up making a lot of incremental advances. Now, it’ll be ideal
if you are able to save your state at each increment with a commit and then proceed forward. This gives you the freedom to try out approaches, go in one way or the other and at each point have a safe harbor to return to. However, this ends up with your history looking messy and folks whom you’re collaborating with have to follow your mental drivel as you slowly built up the feature.
Now imagine if you could do incremental commits but at the same time, before you share your epic with the rest of the world, were able to clean up your history of commits by reordering commits, dropping useless commits, squashing a few commits together (remove those ‘oops missed a change’ commits) and clean up your commit messages and so on and then let it loose on the world!
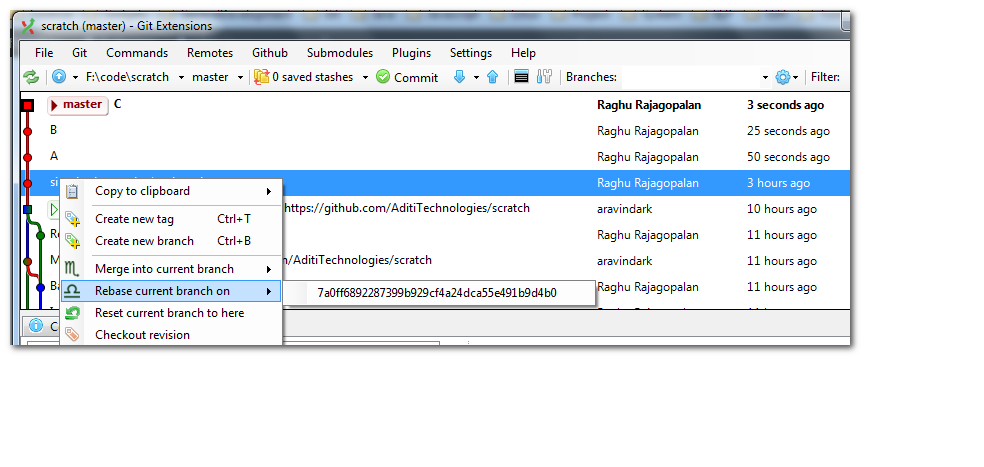
Git’s interactive rebase lets you do exactly this!!!
Git’s magic incantation to rewrite history is git rebase -i. This takes as argument a commit or a branch on which to apply the effects of rewritten rebase operation
Lets see it in operation:
Let’s say you made two commits A and B. Then you realize that you’ve missed out something which should really have been a part of A, so you fix that with a ‘oops’ commit and call it C. So your history looks like A->B->C whereas you’d like it to look like AC->B
Let’s say your history looks like this:
    bbfd1f6 C                           # ------> HEAD
    94d8c9c B                           # ------> HEAD~1
    5ba6c52 A                           # ------> HEAD~2
    26de234 Some other commit           # ------> HEAD~3
    ....
    ....
You’d like to fix up all commits after ‘some other commit’ – that’s HEAD~3. Fire up git rebase -i HEAD~3
The HEAD~3 needs some explaining – you made 3 commits A, B and C. You’d like to rewrite history on top of the 4th commit before HEAD (HEAD~3). The commit you specify as the base in rebase is not included. Alternatively, you could just pick up the SHA1 for the commit from log and use that in your rebase command.
Git will open your editor with something like this:
    pick 5ba6c52 A
    pick 94d8c9c B
    pick bbfd1f6 C
    # Rebase 7a0ff68..bbfd1f6 onto 7a0ff68
    #
    # Commands:
    #  p, pick = use commit
    #  r, reword = use commit, but edit the commit message
    #  e, edit = use commit, but stop for amending
    #  s, squash = use commit, but meld into previous commit
    #  f, fixup = like "squash", but discard this commit's log message
    #  x, exec = run command (the rest of the line) using shell
    #
    # These lines can be re-ordered; they are executed from top to bottom.
    #
    # If you remove a line here THAT COMMIT WILL BE LOST.
    #
    # However, if you remove everything, the rebase will be aborted.
    #
    # Note that empty commits are commented out
Basically, git is showing you the list of commands it will use to operate on all commits since your starting point. Also, it gives instructions on how to pick (p), squash (s)/fixup (f) or reword(r) each of your commits. To modify the history order, you can simply reorder the lines. If you delete any line altogehter, then that commit totally skipped (However, if you delete all the lines, then the rebase operation is aborted).
So, here we tell that we want to pick A, squash commit C into it and then pick commit B.
    pick 5ba6c52 A
    squash bbfd1f6 C
    pick 94d8c9c B
Save the editor and Git will perform the rebase. It will then pop up another editor window allowing you to give a single commit message for AC (helpfully pre filled with the two original messages for A and C). Once you provide that, git rebase proceeds and now your history looks like AC->B as you’d like it to be.
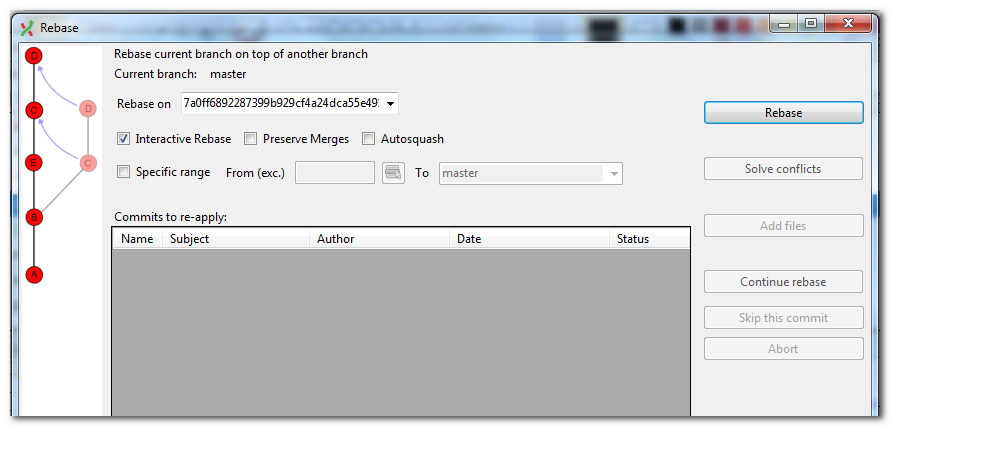
If the editor window comes up blank then the likely cause is that you have both cygwin and msysgit installed and GitExtensions is using the cygwin version of git. Making sure that msysgit is used in GitExtensions will avoid any such problems.
Rewrite history only for what you have not pushed. Modifying history for something that’s shared with others is going to confuse the hell out of them and cause global meltdown. You’ve been warned.
You could end up with a conflict – in which case you can simply continue the rebase after resolving the conflicts with a git rebase --continue
Sometimes, you just want the parachute to safety in between a rebase. Here, the spell to use is git rebase --abort
Being able to rewrite history is a admittedly a powerful feature. It might even feel a little esoteric at first glance. However, embracing it gives you the best of both worlds – quick, small commits and a clean history.
Another and probably more important effect is that instead of ‘waiting to get things in shape’ before committing, commits happen all the time. Trying out that ingenious approach that’s still taking shape in your head isn’t a problem now since you always have a point in time to go back to in case things don’t work out.
Being able to work ‘messily’ and commit anytime and being secure in the knowledge that you’d be able fix up stuff later provides an incredible amount of freedom of expression and security. Avoiding the wasted mental cycles spent around planning things carefully before you attack your codebase is worth it’s weight in gold!!!
So I got my Dad the 8GB Nexus 7. This is an awesome tablet – exactly what a good tablet should be. The UI is buttery smooth and things just fly. The hardware is not a compromise, excellent price point and overall a superb experience.
Of course, there are some things to deal with like 8 GB storage,lack of mobile data connectivity, lack of expandable storage and no rear camera. These aren’t issues at all as far as I’m concerned.
If I’m traveling with the tablet, then I always have the phone’s 3G data to tether to using WiFi tethering. The 8GB storage is only an issue if you’re playing the heavyweight games or want to carry all your videos or a ton of movies with you. Given the 8GB storage, I’m more than happy to load up a few movies/music before travel. Provided you have a good way to get files/data in and out of the computer and are OK with not carrying your complete library with you always, you don’t have to worry about the storage. A camera though would be nice – but then hey – you can’t have everything your way :).
Which brings us to the topic of file transfers to/from your PC. Now wifi is really the best way to go – and I couldn’t find a way to make WiFi direct work with Windows 7. So for now, Connectify seems to be the best option. It runs in the background on your PC and makes your PC’s wireless card publish its own Wireless network. You can connect to this network from your phone and if you share folders on your PC, you’re set to move data around.
Now, on the Android side, ES file explorer is free and gets the job done from a file management/copying/moving perspective. I also tried File Expert but its more cumbersome. ES excels in multiple file selection and copying.
The one area where the N7 excels is for reading books. The form factor and weight are just right for extended reading sessions. However, Google Play books doesn’t work in India and so you need an alternate app. I tried out Moon+ Reader, FBReader and Reader+ – and out of the lot, FBReader was the best. Moon+ has a nicer UI but choked on some of my Ebooks. Reader+ didn’t get the tags right and felt a little clunky. FB reader provided the smoothest experience of the lot. I’m already through half of my first book – and did not have any issues. I have a decent collection of e-books on my PC but once I copied them to the N7, all the meta data was messed up. Editing metadata and grabbing covers is a pain on the tablet and best done on the PC.
This is where Calibre comes in – this is a full blown ebook library management app. It does a great job of keeping your ebooks organized and editing the metadata on them. It can also fetch metadata and covers from Amazon and google and update your collection. Once you’re done, transferring to the N7 is a little tricky. The first time, I just copied the library over to the N7 – but N7 showed each book thrice. Some troubleshooting later, found that the best way was to create an export folder and use teh ‘Connect to Folder’ feature to mount it as a destination. Then you can select all the books you want and use the ‘Send to destination in one format’ to publish EPub format to the folder. This generates one epub file per book with the metadata and covers embedded in it and you can then copy this folder over to the N7’s Books folder using ESFileExplorer
My movie collection is on XBMC – and XBMC is DLNA/uPNP compatible. Dive into XBMC system settings and make turn on the uPnP/DLNA services. Then on the N7, you can use uPnPlay. For playing video, it relies on having a video player app isntalled. I like MXplayer. Don’t forget to also install the HW Player codec for ARM V7 and to turn on HW decoding in the settings.
You wont be doing much of this as there isn’t a rear camera – but if you do decide to take a video or pics from the N7’s FFC, then you can use the uPnPlay to project them on to your TV (that is, provided you have a DLNA/uPnP compatible TV or compliant media center hooked to your TV)
For XBMC, turn on uPnp in settings and you’re done. XBMC should be able to discover your tablet and you’ll be able to browse and play videos.
If you’d rather use the table to control what’s played on XBMC, then turn on the setting to allow control via uPnP in XBMC settings. Now, in uPnPlay you can select XBMC as the play to device and playing any video/song, plays it on the tv.
That’s all for now… I’m loving this tablet and the stuff it can do… looks like I’d be buying a few more soon 🙂
